Monday, November 16, 2015

Overnight Stone Ground Oats

I really got into overnight oats recently with rolled oats, so I decided I'd give it a try with steel cut oats as well. 

I found this oatmeal in the grocery store and decided to give it a go. I love coconut and coconut milk, so I used that this time around. With steel cut oats you use a 1:1 ratio of liquid to oats. After some experimenting, I found that a 1:2 ratio of oats to liquid works best. In this instance, I like to use 1/3 of a cup of oatmeal to 2/3 of a cup of coconut milk. 


I'll often add a little something else to the oatmeal to give it different flavoring. My ultimate favorite is the dark chocolate sea salt caramel sauce from Stonewall Kitchen. I'll also mix in some of my homemade triple berry jam at times too. I'll make a few batches and will throw them in the fridge overnight or for a few nights and will just heat them up the next morning for about 2 minutes. Super easy!


Monday, November 9, 2015

Mashed Cauliflower

Sometimes I get an idea in my head and can't get it out. I've seen mashed cauliflower on menus and online all the time, but I never really paid much attention to it. Then I decided I needed to make some. So never having tried it before or read a recipe on how to make it, I just set out to make some. What could go wrong? (Turns out nothing.)

I started by taking about half a package of FROZEN cauliflower and put it in a pot with about 1/4 cup of chicken broth. I covered the pan and let it steam for a good 15-20 minutes until the cauliflower was super soft.


Then I took my immersion blender to the cauliflower mixture and buzzed it up. I might have pureed it a bit too much this time, but live and learn. I then added a splash of 1% milk to the cauliflower to thin it out. It might look like a lot, but that's probably 2 tablespoons of milk.


At the very end I sprinkled in a little grated parmesan cheese for a little flavor since I found the mashed cauliflower needing a little something extra. This did just the trick. 

Wednesday, November 4, 2015

Brown Sugar Nutmeg Green Beans

Last weekend we had a nice dinner with my grandmother. In addition to a dessert, I was tasked with bringing a green veggie. I decided to pull out my trusty green bean recipe.

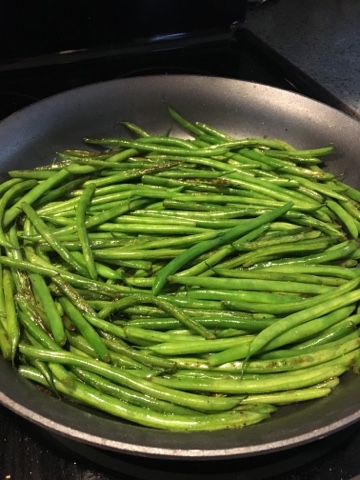
To start, I sautéed a massive bag of green beans in a little butter. This picture is deceiving, this pile of green beans fed eight people.

I sauté them at a fairly medium high temperature to get a nice soft char on the outside without turning them into mush. I like a little crips to them.


Once cooked, I sprinkled on a little bit of brown sugar. This is just about a tablespoon of light brown sugar for enough green beans to serve eight people, so don't overdo it. I mixed it all together and sprinkled in a little nutmeg as well. You basically want to cook this enough to melt the sugar onto the beans but not enough to caramelize it. Once the sugar is melted, you're done.


Serve up and enjoy!


Tuesday, September 22, 2015

Grilled Cod Packet

It's no secret that I love seafood. In fact, there are times when I think I could become a psecatarian, but then I remember that I do love meat, so that thought goes out the window quickly. But one of the things I love about seafood is that there are so many ways to prepare it. Take this easy grilled cod example. While I grill seafood in a foil packet a lot, this was a new way for me to do it, so I thought I'd share. 

To start, I put some cod in foil with some salt, crushed red pepper and garlic. I then added some fresh diced tomatoes, capers, a splash of lemon juice and a splash of white wine. 


I wrapped it all up, placed the packet on the grill and cooked it for about six to eight minutes on each side. My cod was really thick, so I cooked it a little longer. Fortunately, in this example, I had a lot of liquid in my packet, so it kept things moist. 


I served this one up with some wild rice and veggie mix (which was pre-made and I wouldn't buy again, but that's another story). This was simple to make and delicious. I'd definitely recommend it. 

Thursday, July 23, 2015

Grilled Lemon Cod

During the summer I love to grill as much as possible. First, it brings so much flavor to my food, but it also means I don't have as many dishes to do at the end of the day, which is a huge win.

I also really love seafood, but that can also be somewhat difficult to cook on the grill if the fish is very flaky. As a result, sometimes I'll cook fish in a foil packet.


For this packet I lined the bottom with three slides of lemons. I didn't bother removing the seeds, but if you want to take the time to remove them, go for it.


I then placed the cod on top of the lemon and seasoned it. You can rearrange your lemons to fit better under the fish like I did if you'd like. I just coated the fish with my favorite garlic, salt and crushed red pepper seasoning blend. You could season it with some salt, pepper and lemon dill seasoning too.


I forgot to grab a photo of it, but before I closed the packet up I added a little lemon dill butter to the top. If you don't have that, just a little drizzle of olive oil or a pat of butter works just fine. If you use butter, I highly recommend unsalted since it's really easy to over salt seafood. In general I use unsalted butter with everything to control the salt. I actually can't remember the last time I bought salted butter.


Throw your fish on the grill. I had my burner on a medium-high heat that registered at around 400* when I closed the grill. On the side here are some partially cooked potatoes coated in just a little olive oil. I microwaved the potato for about 5-6 minutes, sliced it into a few wedges, coated it in oil and added a little S&P (salt and pepper).


Cook the fish on the grill for about 4-6 minutes on each side. I actually like to start with the folded side down so that when I flip it I can check the doneness of the fish easily once I think it's done.


Once done I serve the fish right in the foil packet. You're going to have a decent amount of juice from the cooked lemons and the little bit of butter. If you're concerned about a puncture to the foil, I recommend using two places or placing a napkin under the foil to absorb the juice. 

Wednesday, July 1, 2015

Spinach and Feta Omelet

Sometimes I enjoy having breakfast for dinner. Yesterday I did just that, enjoying a great spinach and feta omelet. 
I started by chopping up a little spinach - two big handfuls since it reduces down so much.

Then I sautéed it in the garlic herb butter I made (garlic, parsley and unsalted butter). I used about a teaspoon of butter for the spinach. 

While the spinach was cooking up, I threw two eggs and about 1/4 cup of milk in a bowl and whisked it up.

I probably use a little more milk than others traditionally use, but I like it a little more creamy.

When the spinach is almost all wilted I add the eggs to the pan. I don't wait until the spinach is completely cooked down because it will cook more when the eggs are added.

I'll run a rubber spatula around the edge of the pan and get the runny egg to the surface of the pan to cook more.

Fip the omelet when you just start to see a little color either using a spatula or a plate. I opted for the plate to not make a big mess. I then added a handful of feta to one side of the omelet and folded the egg over to help melt the cheese.

That's it! Enjoy this simple yet delicious omelet. 

Monday, June 29, 2015

Mushroom Ragu

One of the things that I really cut back on when I was trying to lose weight was pasta. But sometimes I just really want a good, hearty bowl of pasta. But I knew I could make something that still tasted wonderful but might be slightly healthier than your regular meat sauce. Insert one of my favorite veggies - mushrooms! 

To start, I took an entire package of button mushrooms and diced them finely using this chopper I have. You can easily just put them in the food processor and pulse it a few times until you get a coarse consistency. Basically, the mushrooms will look like ground beef when cooked, so you want the pieces smaller than a pea, but not much smaller. 


My secret to this sauce is the marsala wine I add to the ragu. I'm going to preach here for a second - DON'T buy that cheap stuff in the vinegar aisle that's $4 a bottle. Spend the extra $6 for this better (this brand or similar brands - I'm not endorsing one particular brand) $10 bottle of Marsala wine. First of all, you get more for that $10, but you'll also get a MUCH better flavor out of it.


I whipped up some garlic parsley butter a few days prior with some fresh herbs my mom gave me from her garden just by softening some unsalted butter, adding in some diced garlic and some minced parsley. I took about a tablespoon of this and sautéed the mushrooms in it.


Don't salt your mushrooms yet, it will make things watery right now, and we don't want that. Once sautéed, add in about 1/2 a cup of the marsala wine and reduce it down. The mushrooms will absorb all of that wonderful flavor and the wine flavor will concentrate.


Once reduced, add your favorite marinara sauce - about 2/3 of a cup and let it cook about 10  minutes. Pour over your favorite pasta and enjoy! This might be my new favorite pasta sauce right now. The marsala adds such a nice flavor and I don't even miss the meat. Enjoy!